


I visit dozens of newly built houses across Central India every month, and I constantly see the same mistake. People spend ₹15 lakh on premium Indian or Italian marble, polish it to a mirror finish, and then lay it wall-to-wall without a single break. The result? A massive, empty floor that feels like a commercial hotel lobby rather than a warm, structured home.
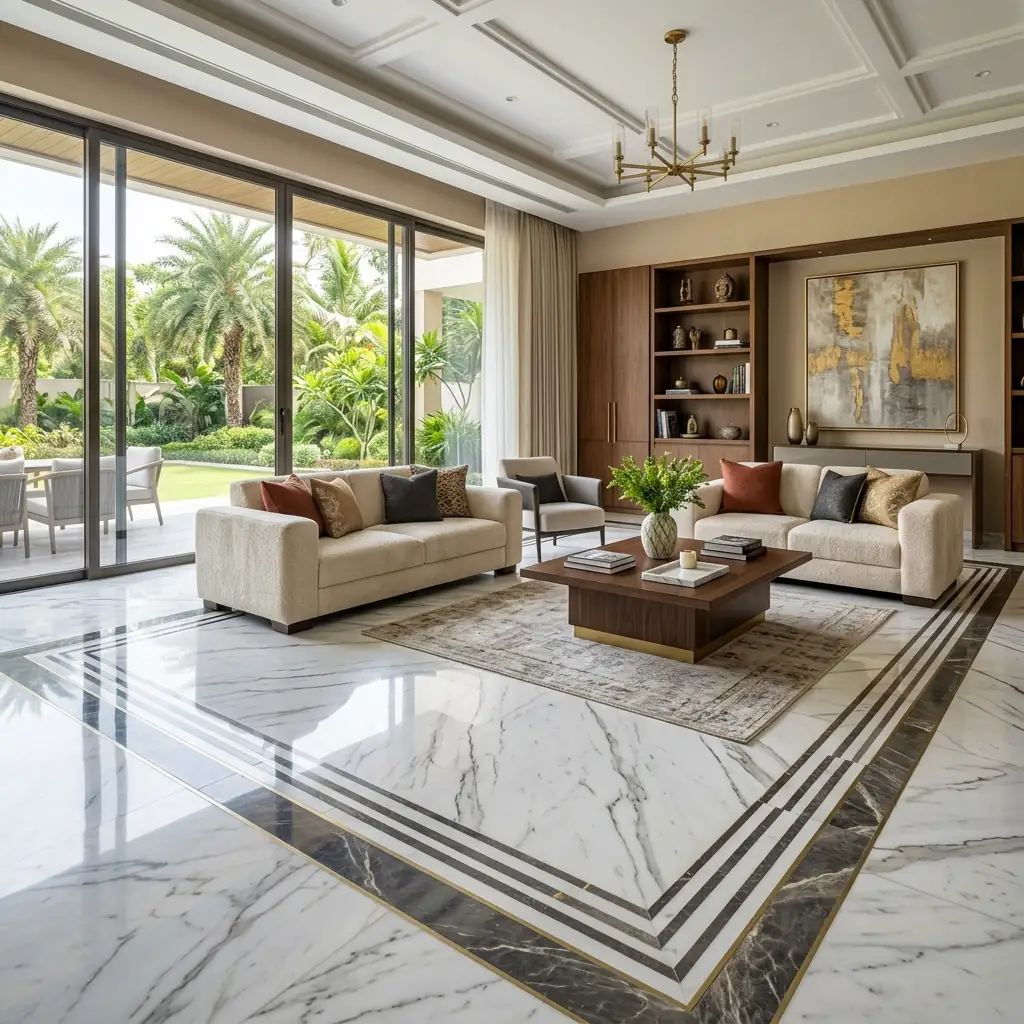
If you want to visually define your spaces without building walls, a modern marble floor border design is the smartest solution. I always tell my clients that a well-designed border doesn’t just decorate the floor. It frames the room, separates the dining area from the living space, and adds that final touch of luxury.
Let us explore the best materials, patterns, and combinations to make your stone flooring stand out and give your home a high-end architectural finish.
Table of Contents
Why Your Home Needs a Modern Marble Floor Border Design
A modern marble floor border design acts as a visual divider in open-plan homes. It separates functional zones without needing physical walls, highlights central floor motifs, and adds an architectural framing element that breaks the monotony of large floor spaces.
Open floor plans are standard in modern home architecture today. While this makes houses feel larger, it creates a serious visual challenge. How do you separate the dining area from the formal living space when there are no physical walls between them?
Using carpets is one way, but they get dirty, trap dust, and require constant vacuuming. A stone border solves this permanently. By running a 6-inch strip of contrasting stone, like Black Galaxy granite or PP Black marble, around the perimeter of a seating arrangement, you create a distinct zone. You are drawing a line on the floor that tells the brain where one functional area ends and another begins. This zoning technique is especially useful in premium residential layouts.
Beyond zoning, borders help fix awkward room shapes. If a corridor feels too long and narrow, horizontal border bands can visually widen the space. If a room lacks character, a double-frame border adds immediate depth. The structural lines anchor your heavy furniture, making sure sofas and dining tables do not look like they are floating aimlessly in the middle of nowhere.
The secret to a successful installation is contrast. You cannot use Katni beige for the main floor and a slightly darker beige for the border. It just looks like a design mistake. You need sharp, intentional contrasts to make the design work. When choosing a layout, think about how the lines will align with your doors, windows, and main furniture pieces. It is the details that turn basic flooring into custom architecture.
15 Inspiring Modern Marble Floor Border Design Ideas
The best modern marble floor border design ideas focus on visual contrast and geometric harmony. Popular options include minimalist 2-inch black bands, layered double frames, intricate CNC-cut Greek key patterns, brass-stone combinations, and textured flamed granite borders that redefine interior zones.
I see way too many boring floors. Homeowners spend lakhs on beautiful slabs only to let the final effect fall flat due to poor layout planning. Here are fifteen ways I suggest handling floor borders to bring real personality and custom structure to your rooms.
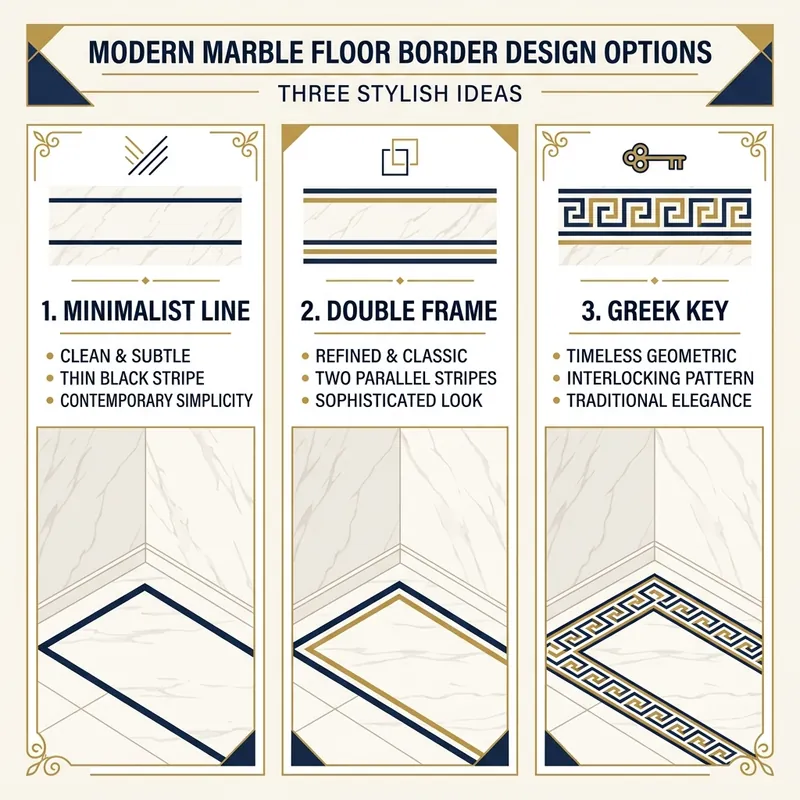
1. The Minimalist Floating Line
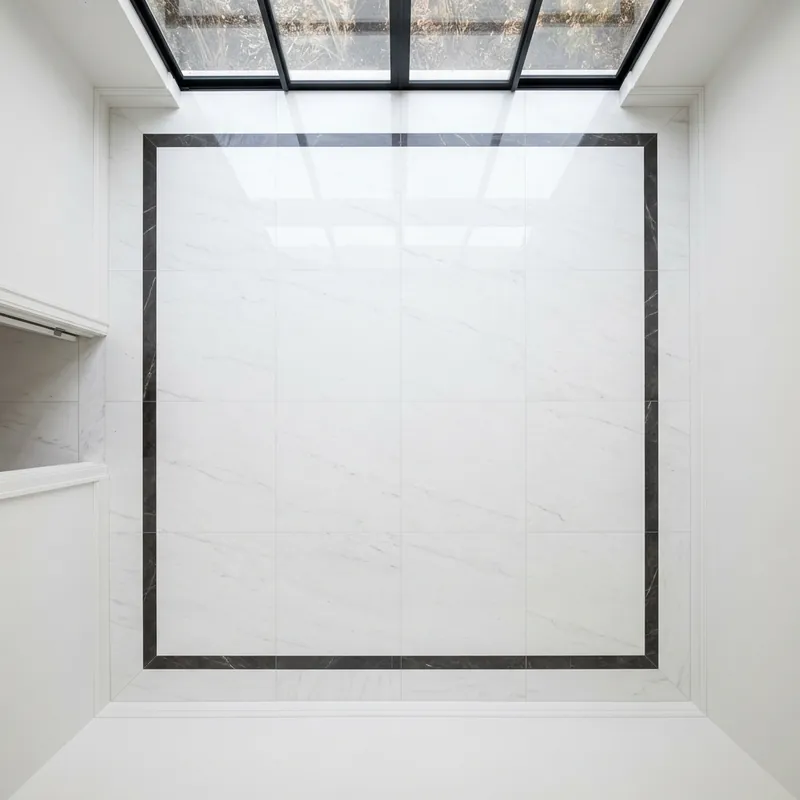
In contemporary Indian apartments, especially in cities like Indore and Mumbai, space is at a premium. Running a thick, heavy border right next to the wall makes the room feel smaller. The minimalist floating line is a smart alternative. Instead of placing the border at the edge of the room, you run a thin 2-inch strip of dark stone, like PP Black or Nero Marquina, about 12 to 18 inches away from the skirting board. The main floor marble continues on both sides of this strip. This creates a visual boundary that behaves like a custom floating rug in the centre of the living room. It is a quiet, sophisticated technique that provides structural division without dominating the room.
2. Classic Double-Frame Contrast
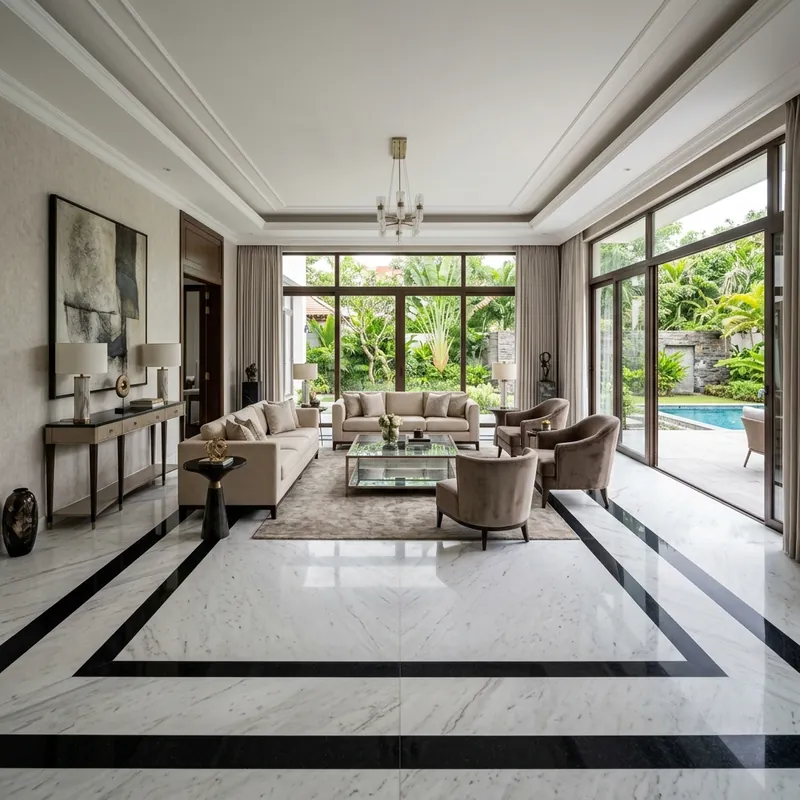
For expansive bungalows and spacious drawing rooms, a single thin border can easily get lost in the sheer scale of the flooring. A double-frame border is the perfect antidote. In this design, we lay an outer 4-inch frame of contrasting dark stone, leave a 6-inch gap of the lighter main floor marble, and then run a second, thinner 2-inch frame of the same dark stone. This layered boundary acts like a classic picture frame, giving the room's perimeter significant visual weight. It is an excellent choice if you have high ceilings and want to anchor the floor to match the heavy ceiling moulding above.
3. The Geometric Greek Key Inlay
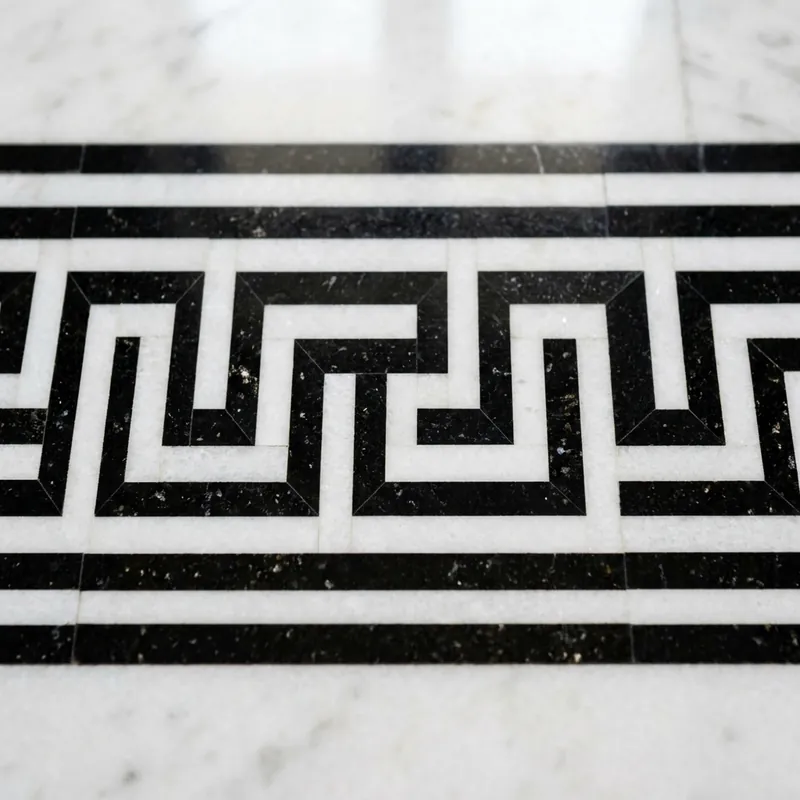
If you want to introduce a touch of classical grandeur that feels highly premium, the Greek Key pattern is a timeless candidate. The Greek Key is a continuous, interlocking geometric line that requires absolute precision to look right. We utilise CNC water-jet machines to cut the patterns out of a dense dark stone, nesting them into a clean white marble base like Makrana or Banswara White. It is a highly structured look that works best in grand entrance lobbies or main hallways. It gives a clear visual rhythm and alerts visitors that they are entering a carefully designed space.
4. Checkerboard Hallway Borders
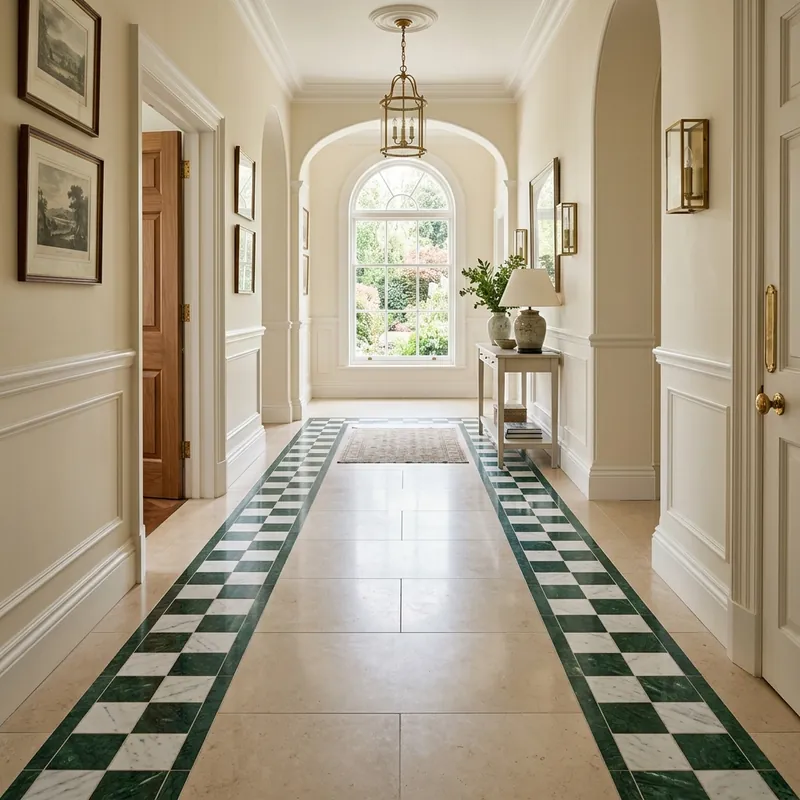
Corridors and passages are frequently treated as afterthoughts in Indian home design, with contractors simply running the main flooring tiles straight through. However, you can add major character by running a checkerboard border along the sides of the passage. We use alternating 4x4 inch square tiles of Indian Green (Udaipur Green) and Morwad White to form a repeating pattern on either side of a central walkway. This framing gives the corridor a sense of direction, transforming a boring transit zone into a vintage passage that feels warm and heritage-inspired.
5. Brass and Marble Integration
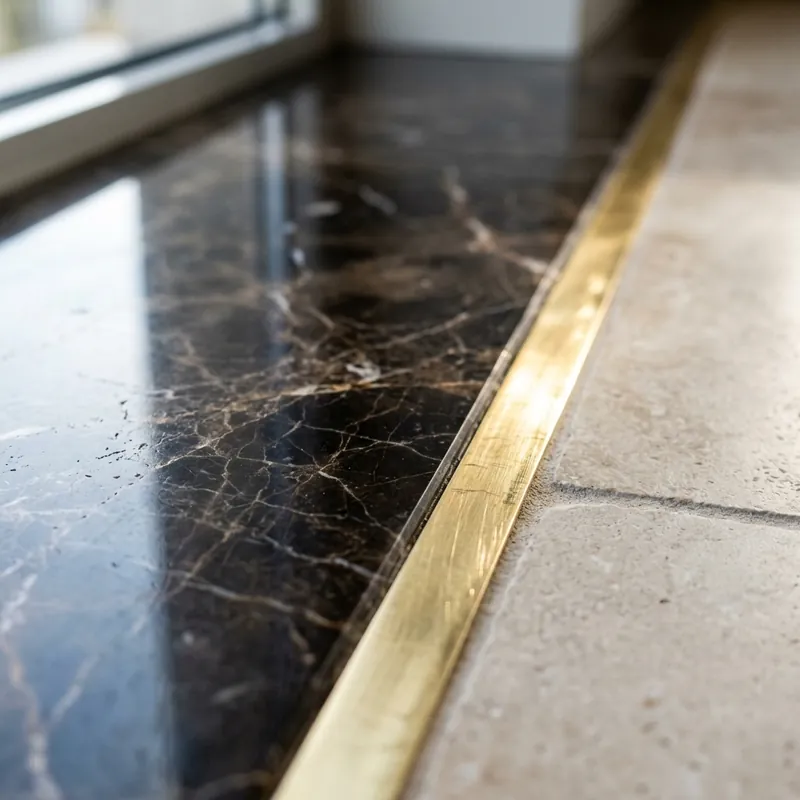
This is one of the most sought-after trends in luxury Indian interior design today. Instead of using only stone, we embed 5mm or 8mm solid brass strips right alongside a dark marble border. The brass strips are laid flush with the stone and polished together. When the light hits the floor from sliding balcony doors or ceiling chandeliers, the metallic elements catch it, casting a warm, premium glow. Over time, the brass will develop a subtle, soft patina that adds character, making the floor look even more authentic and expensive.
6. The Central Rosette Frame
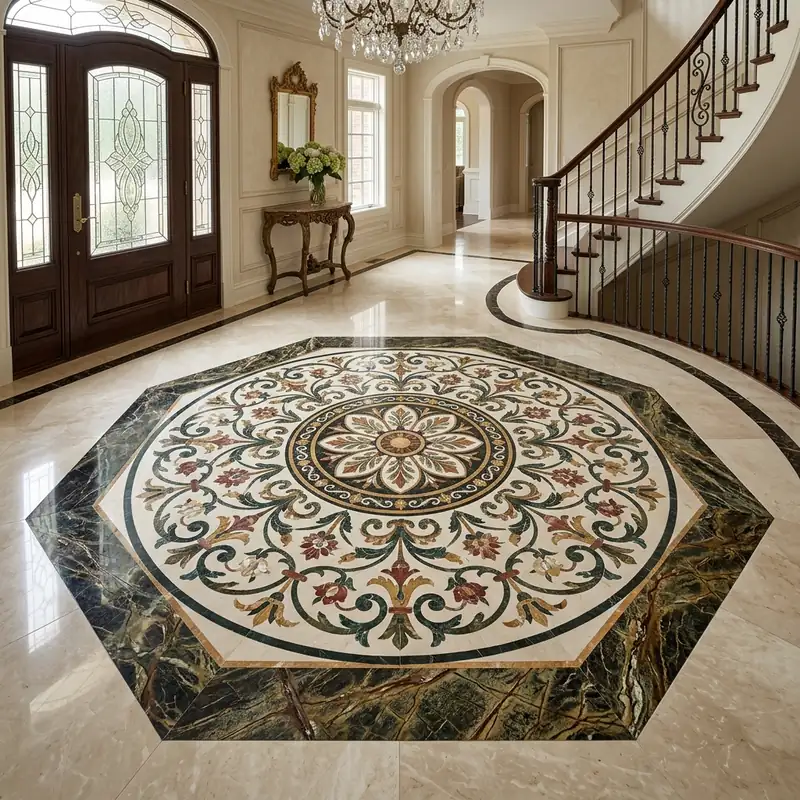
If you are planning a decorative floor medallion or a floral rosette in your entrance foyer, it will look disconnected if left alone on a plain floor. To anchor it, you need a visual frame. The border acts as a visual containment zone. We use contrasting stones like rainforest brown or black granite to frame the rosette, ensuring that the central artwork is highlighted rather than appearing to float aimlessly in a large open space.
7. Vertical Corridor Stretching
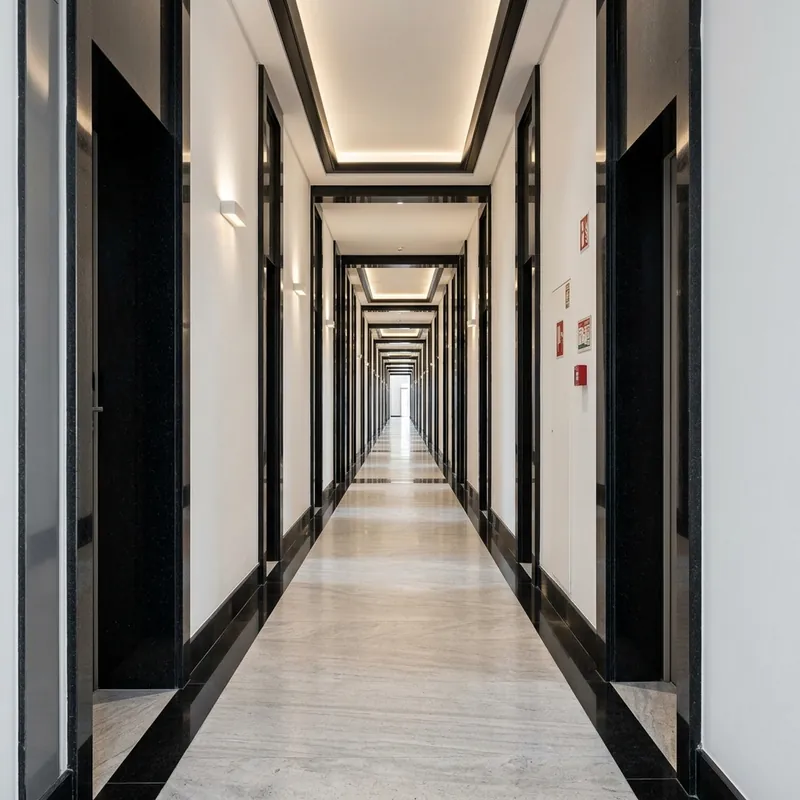
Most floor borders are laid horizontally, running perpendicular to your path of travel. However, in short, narrow passages, horizontal lines will make the space look boxy and restricted. In these areas, I instruct my masonry team to run unbroken vertical border lines along the length of the hall, without any horizontal cross-lines at the ends. This simple visual trick draws the eye forward, elongating the perspective and making the corridor feel significantly longer than its physical dimensions.
8. The Dark Perimeter Plinth
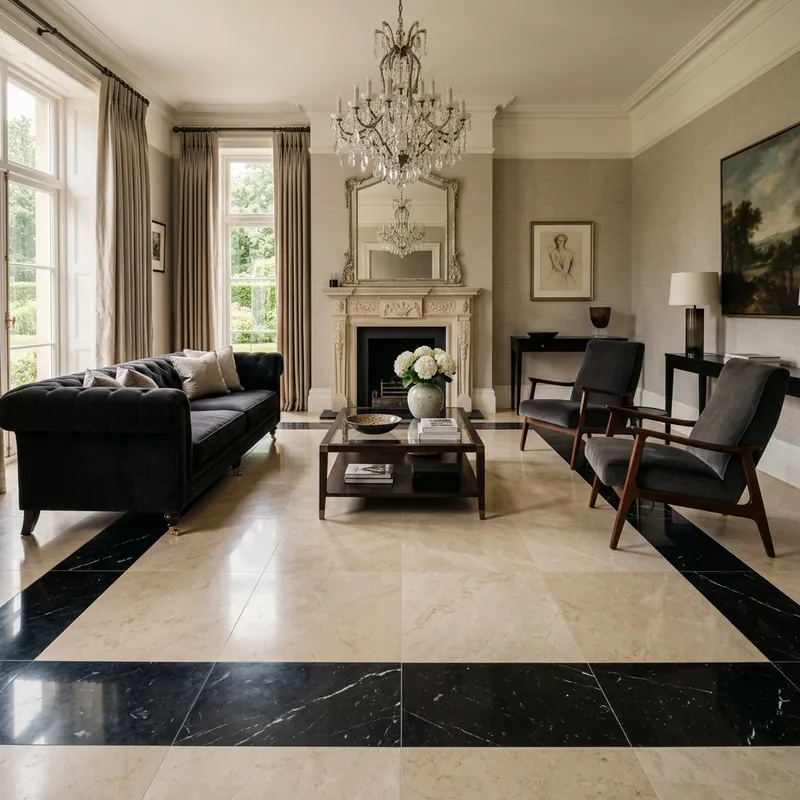
Rather than using a thin border line, this bold design uses a thick 12-inch or 18-inch band of dark granite or marble that covers the entire perimeter of the room, hugging the skirting boards. The lighter central marble is then laid within this dark frame. This is a highly functional design choice: it creates a strong visual boundary, anchors large sofas and sideboards, and hides the dust and lint that naturally gather at the room's edges, keeping your floor looking clean.
9. Chevron Corner Accents
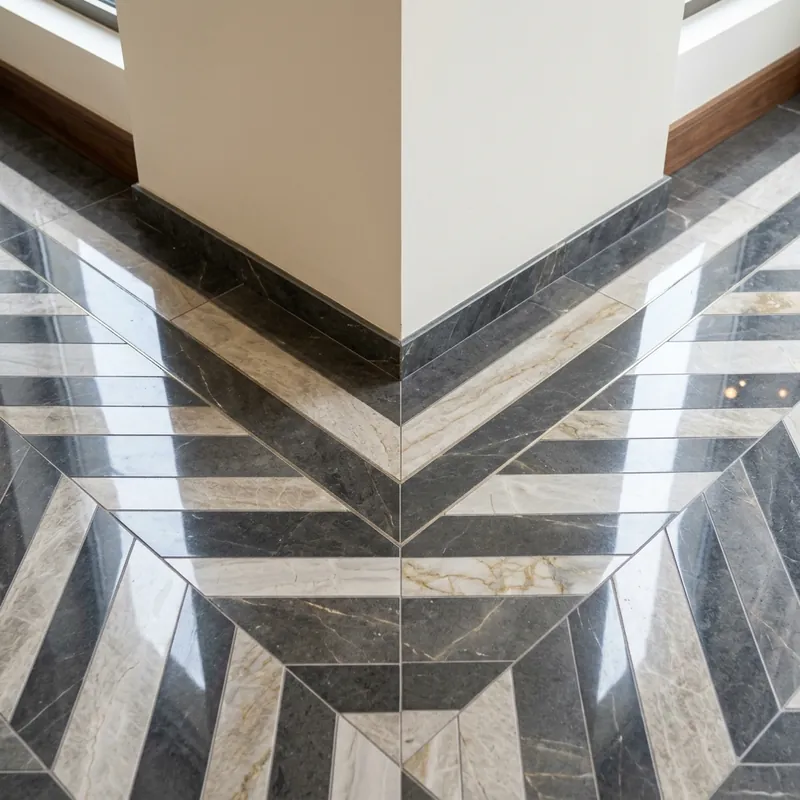
A continuous border line around the entire room can sometimes feel too rigid. For a softer, more modern touch, you can leave the edges of the room plain and install intricate chevron or herringbone patterns exclusively in the four corners. We cut and lay the stones in alternating diagonal patterns that meet at the corner joints. It is a subtle, artistic detail that guests only notice when they walk into the room, offering a quiet, custom-built surprise.
10. Two-Tone Soft Contrast
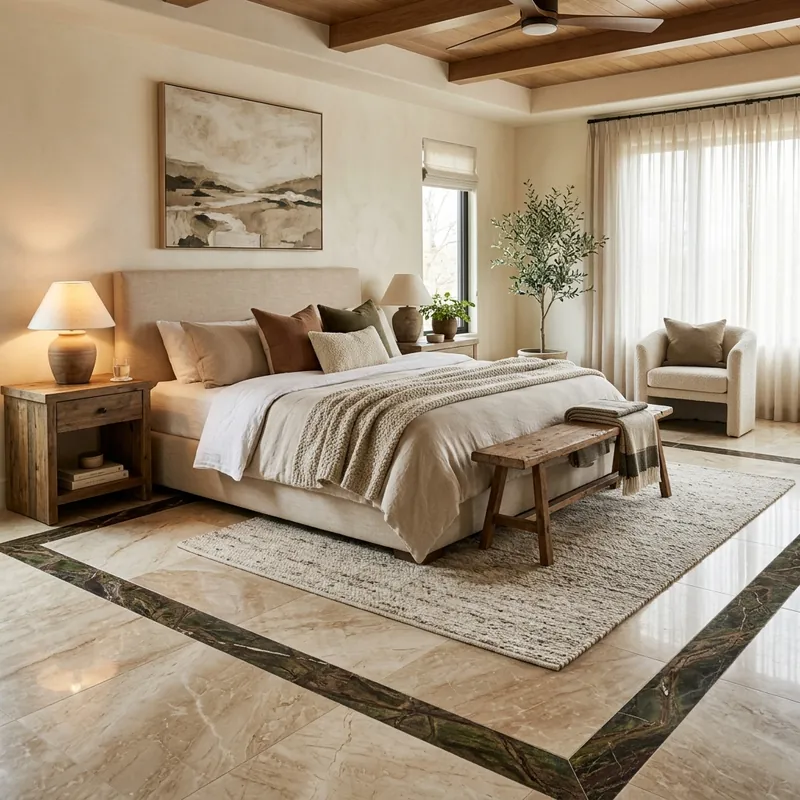
If high-contrast black and white feels too sharp or cold for your home, two-tone soft contrast is the perfect alternative. We pair a warm beige Katni or Dainik marble floor with a rainforest brown or dark beige border. The contrast is gentle, providing structural zoning without dominating the visual space. It is a popular option for master bedrooms and puja rooms, where the goal is to create a warm, calm, and relaxing environment.
11. The Triple-Band Transition
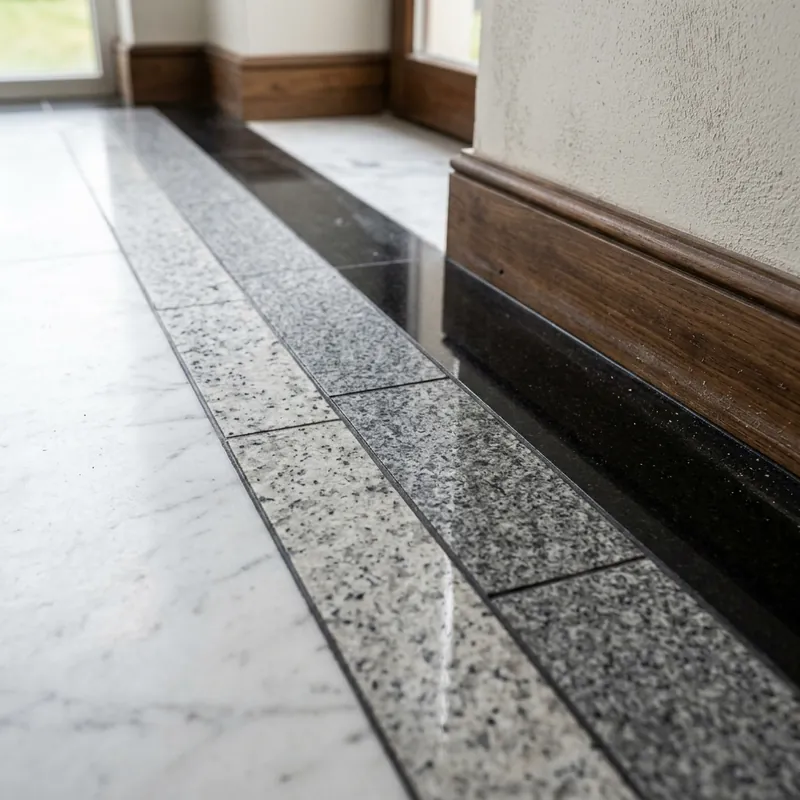
For the ultimate gradient effect, you can use a triple-band design. This requires three stones in progressive shades. For example, a white marble floor transitioning to a 2-inch light grey band, followed by a 2-inch medium grey band, and ending with a 4-inch dark charcoal or black granite band at the wall. This stepping-stone transition creates a beautiful visual gradient, adding immense depth and soft architectural structuring to the room's borders.
12. Floral CNC Water-Jet Motifs
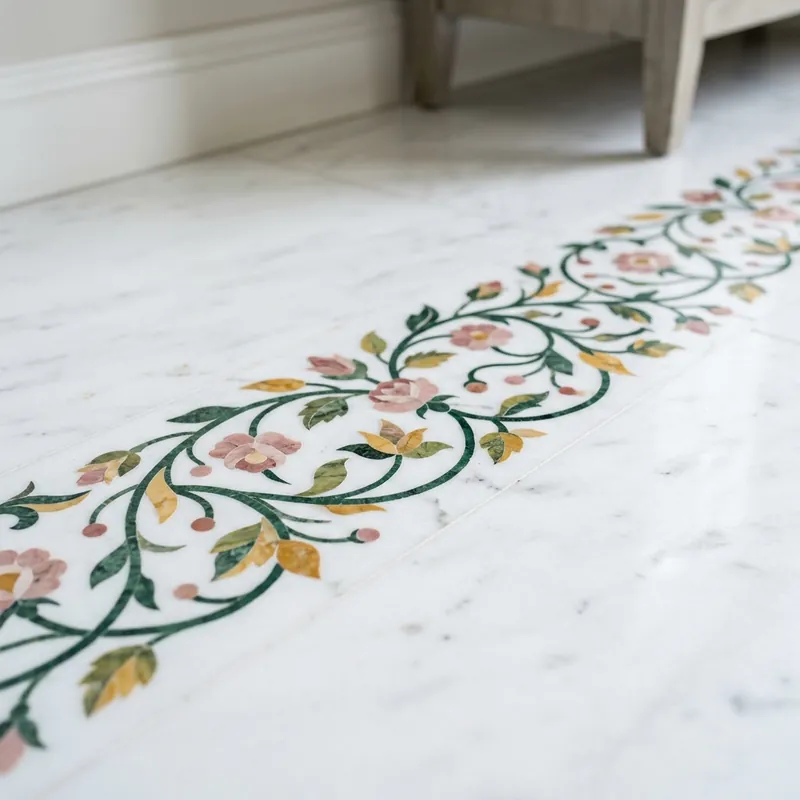
For traditional Indian home interiors or houses with classical themes, a floral vine border is highly recommended. Using high-pressure water-jet machines, we cut intricate leaf and flower patterns into a solid border strip, then fill those cavities with contrasting green, yellow, or pink marbles. It is a highly skilled craft that turns your floor borders into a continuous, organic garden wrapping around your living space, giving it a customised, luxurious touch.
13. Staircase Landing Frames
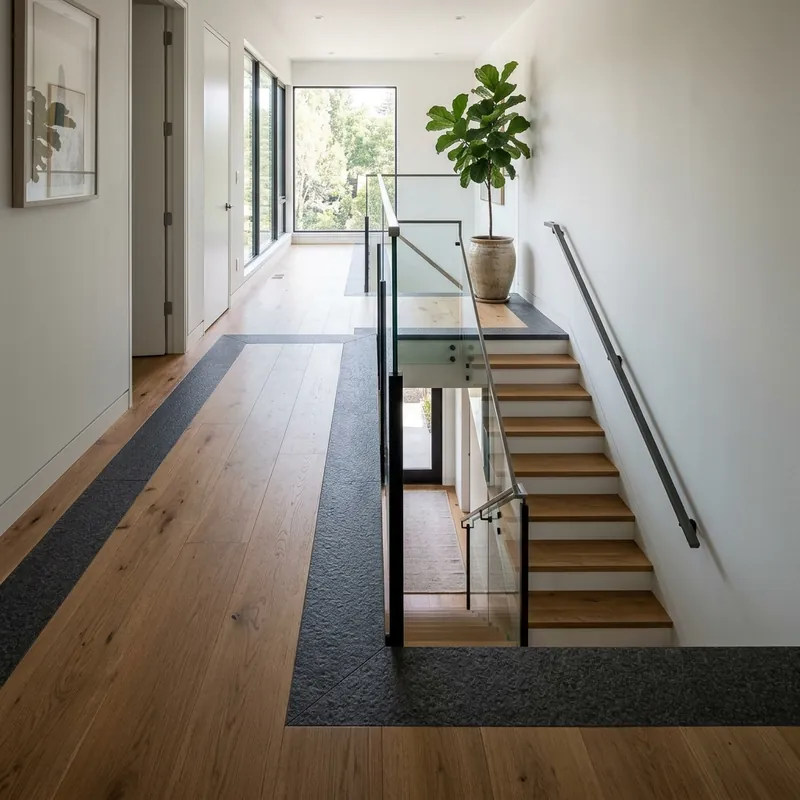
Staircase landings are highly visible transit areas that are often ignored. Laying a simple square border around the landing area marks the transition between floor levels and frames the stair flight. For this specific area, I recommend using a textured stone, like a leather-finish granite or honed marble, for the border. The difference in texture acts as a subtle physical cue that you are approaching the stairs, adding a layer of safety for children and elderly family members.
14. The Offset Asymmetric Border
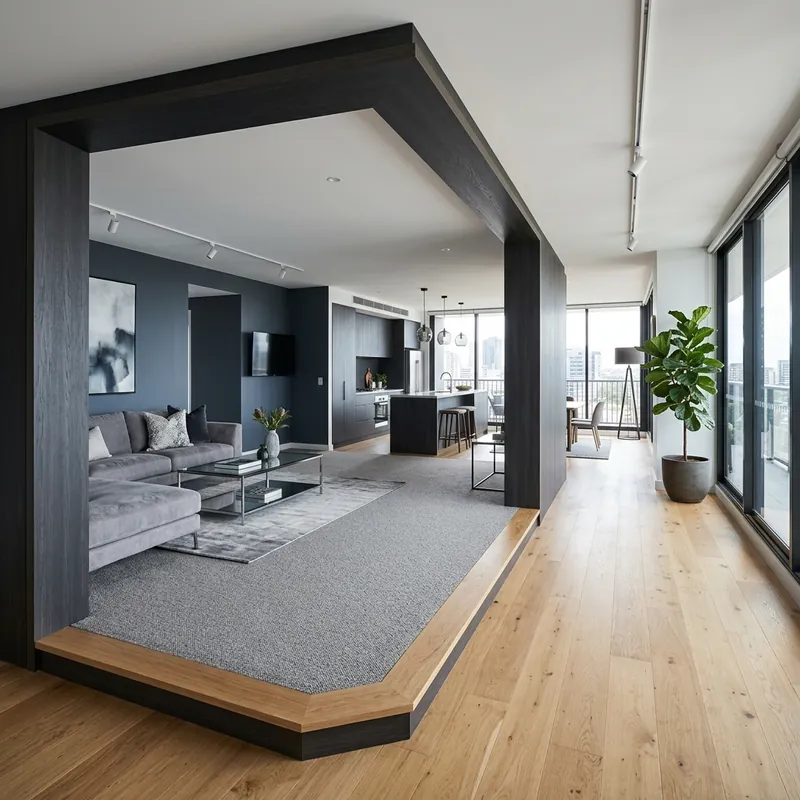
In ultra-modern, architect-designed homes, symmetry can sometimes feel boring. An offset asymmetric border breaks the traditional rules of design. We run a contrasting border exactly 12 inches away from three walls, but push it 3 or 4 feet away from the fourth wall. This creates a wide, dark stone walkway on one side of the room, which can be used to define a clear corridor path or to highlight a row of indoor planters and floor-level lighting.
15. Textured Granite Edge Trim
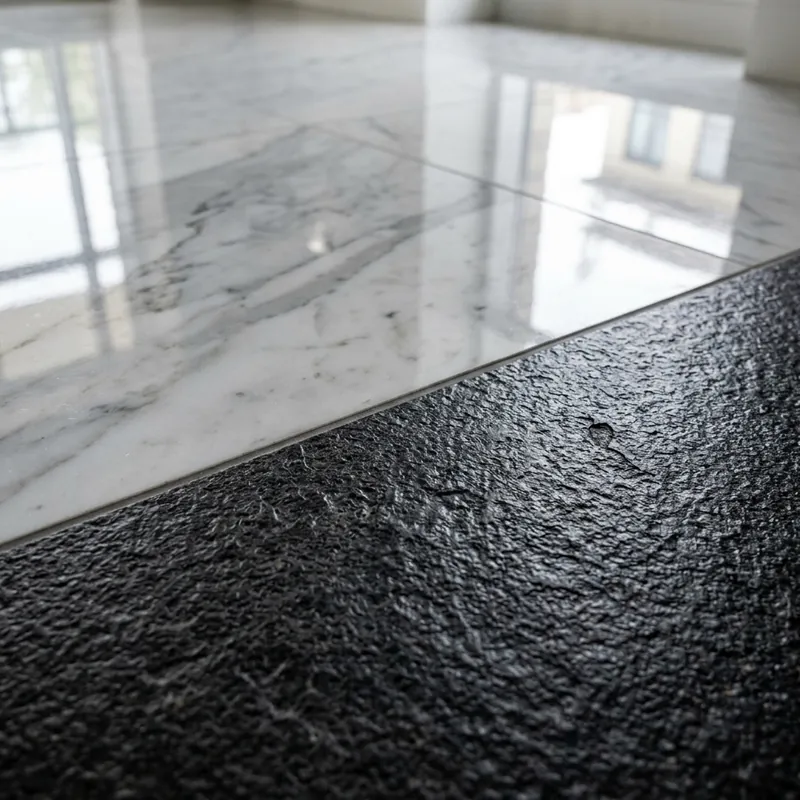
Who says all stone flooring must be polished to a mirror finish? A very effective technique is to pair a high-gloss polished marble floor with a textured border made of leather-finish granite or flamed slate. The tactile contrast when you walk barefoot from the smooth, cool marble onto the slightly textured border is incredibly satisfying. It adds a physical, sensory dimension to the design that most homeowners and designers completely overlook.
Choosing Stone Combinations for a Modern Marble Floor Border Design
Stunning stone combinations rely on clear colour contrast and material compatibility. Pairing white Makrana marble with black marble creates a timeless monochrome theme, while combining warm Katni beige with Indian Green stone creates a rich, traditional aesthetic suited to classic Indian home decor.
You can have a great pattern, but if you pick the wrong stones, the final installation will fall flat. Some stones fight each other visually, while others wear down at different rates. If you are selecting stones for a marble stone flooring layout, here are five combinations that work beautifully:
- Makrana White and PP Black: This is the ultimate classic monochrome combination. Makrana White has a pristine, milky quality with very soft, light veining. PP Black is a dense, deep black stone. When paired together, the contrast is absolute. I recommend this combination for geometric Greek keys and minimalist borders because it guarantees clean, sharp lines.
- Kashmir White and Black Galaxy Granite: Kashmir White marble features soft grey speckles and a cool undertone. Black Galaxy granite brings dense dark tones embedded with tiny copper flecks that catch light. This pairing is heavily used in contemporary urban apartments because it feels modern and handles high-traffic wear.
- Katni Beige and Indian Green: Katni marble has warm beige and cream tones that feel very earthy. Indian Green marble (Udaipur Green) is bold and deeply traditional. This combination works beautifully in Indian homes with heavy teak wood furniture or traditional brass decor. It feels warm and rich.
- Morwad White and Rainforest Brown: Morwad is an affordable, clean white marble with light grey veining. Rainforest Brown features wild, dense veining that looks like tree branches. Using Rainforest Brown for a thin border tames the wild pattern while keeping the floor visually engaging.
- Statuario White and Nero Marquina: If budget is not a constraint, this Italian marble combination is the gold standard of luxury. Statuario has a bold, dramatic grey vein structure on a bright white background, while Nero Marquina offers a deep black tone with thin white veins. When their veins run near each other, the visual effect is spectacular.
When planning these combinations, ensure that the thickness of the stone slabs is identical. Even a difference of 2mm can lead to excessive grinding during the polishing phase, which wastes stone and increases labor charges.
Water-Jet vs Hand-Cut Marble Borders
Water-jet cutting uses computer-guided high-pressure water to create complex curves and floral borders with zero chipping. Hand-cut borders rely on manual wet saws, which cost less but remain strictly limited to straight lines, squares, and basic geometric shapes.
Clients ask me constantly if they really need to pay extra for water-jet cutting or if manual masonry is enough. The answer depends entirely on the design pattern you choose.
If your layout is limited to straight lines, double frames, or simple squares, manual cutting is perfectly fine. A skilled local mason using a diamond-blade wet saw can keep the lines straight and clean. The joint gap can be kept minimal, and when filled with colour-matched epoxy, it looks excellent.
However, if you want curves, circles, interlocking Greek keys, or detailed floral patterns, manual cutting becomes a liability. Hand-cutting curved shapes leads to chipped edges and irregular joint lines. The mason will try to cover up these mistakes with thick grout lines, which ruins the luxury look of the floor.
| Feature | Water-Jet Borders | Hand-Cut Borders |
|---|---|---|
| Precision | Computer-guided, millimeter-precise cuts | Manual alignment, higher tolerances |
| Design Options | Utilises curves, intricate florals, calligraphies | Limited to straight lines and simple angles |
| Joint Thickness | Microscopic joints (under 0.5mm) | Wider joints (1mm to 3mm) |
| Edge Chipping | None, smooth finish on all stones | Common on soft stones and tight angles |
| Relative Cost | Premium pricing (per running foot charges) | Economical (usually included in floor laying charges) |
Water-jet machines use a high-pressure stream of water mixed with garnet sand to slice through 20mm marble slabs like butter. The cut pieces fit together like a jigsaw puzzle with near-invisible joints. If your budget allows and you want a complex pattern, water-jet cutting is worth every rupee.
How to Polish and Maintain Marble Borders
Maintaining distinct stone borders requires levelling different stone densities during the polishing process to keep joints flush. Daily cleaning with pH-neutral soap prevents acid etching, while applying a high-quality penetrating sealer every year prevents dark pigments from staining lighter adjacent stones.
Taking care of a floor with a contrasting border requires a bit more care than a plain, single-stone floor. This is because you are dealing with two different stones that often have different physical properties and densities.
The first challenge occurs during the initial polishing. Granite is much harder than marble. If you combine a marble floor with a granite border, a standard polishing machine will grind down the softer marble faster, leaving an uneven lip at the joint. To avoid this, instruct your polishing team to use flexible diamond pads and spend extra time levelling the joints so the floor is perfectly flat.
For daily cleaning, avoid acidic or chemical cleaners. Indian households often use strong floor cleaners, but these will etch the polished surface of the marble, making it dull. Use a simple pH-neutral soap mixed with warm water. Wipe up spills immediately, especially acidic substances like lemon juice, tea, or coffee, as they will leave permanent stains on light-coloured marble.
Finally, stone sealing is essential. Marble is naturally porous. If you have a white marble floor with a dark green or black border, water can carry dark pigments from the border stone into the pores of the white marble, creating a grey shadow at the joints. Applying a high-quality penetrating sealer once a year blocks this migration, keeping your borders clean and sharp. You can read more about caring for stone in our guide to different types of natural stone finishes.
Frequently Asked Questions
Common queries cover choosing the correct border widths, combining marble with harder granite stones, avoiding visual shrinkage in small rooms, choosing grout colours, and understanding budget differences between water-jet and hand-cut inlays.
How wide should a marble floor border be?
Can I mix granite borders with a marble floor?
Will a border make a small room look smaller?
What is the best grout colour to use between the border and the main floor?
How often should I seal my marble floor borders?
Final Thoughts on Floor Borders
A modern marble floor border design transforms basic residential flooring into a custom architectural masterwork. By balancing contrast, selecting durable stones, and employing expert polishing masons, you secure a structural visual grid that adds permanent luxury to your property.
Your floors set the tone for the entire home. While laying plain marble slabs is simple, taking the time to design a custom border layout shows intentionality. It tells everyone who walks in that your house was designed by an expert, not just assembled by contractors.
Whether you choose a minimalist floating line or an intricate water-jet pattern, select stone combinations that complement your furniture and wall colours. If you are planning a flooring renovation and want to get the details right, we can help.
Visit Our Indore Stone Experience Center on Ring Road to explore our stone collection and see our CNC water-jet capabilities in action. You can also WhatsApp us to share your floor plans and get design recommendations tailored to your space.